In Teams and Skype for Business online you can have users dial-in to a meeting using a PSTN number. This can be useful for users that don’t have a good internet connection or can’t use their computer or app on mobile phone of some reason. When you assign a Audio conferencing license to a user they will be able to create a meeting with dial-in phone numbers listed in the invite.
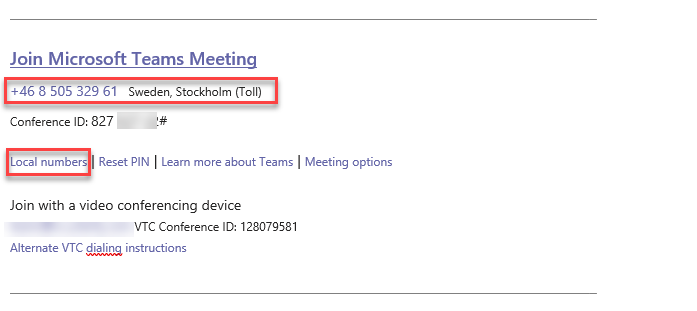
Users that get the invite can call the default number listed in the invite or the can click on Local numbers to get an list of numbers that are available for this meeting. The numbers listed are a combination of numbers provided by Microsoft and service numbers that administrators for the tenant have added.
Dedicated and Shared numbers
When you open Teams Admin Center and check your numbers listed in Conference bridges you can see two different types, Shared and Dedicated.
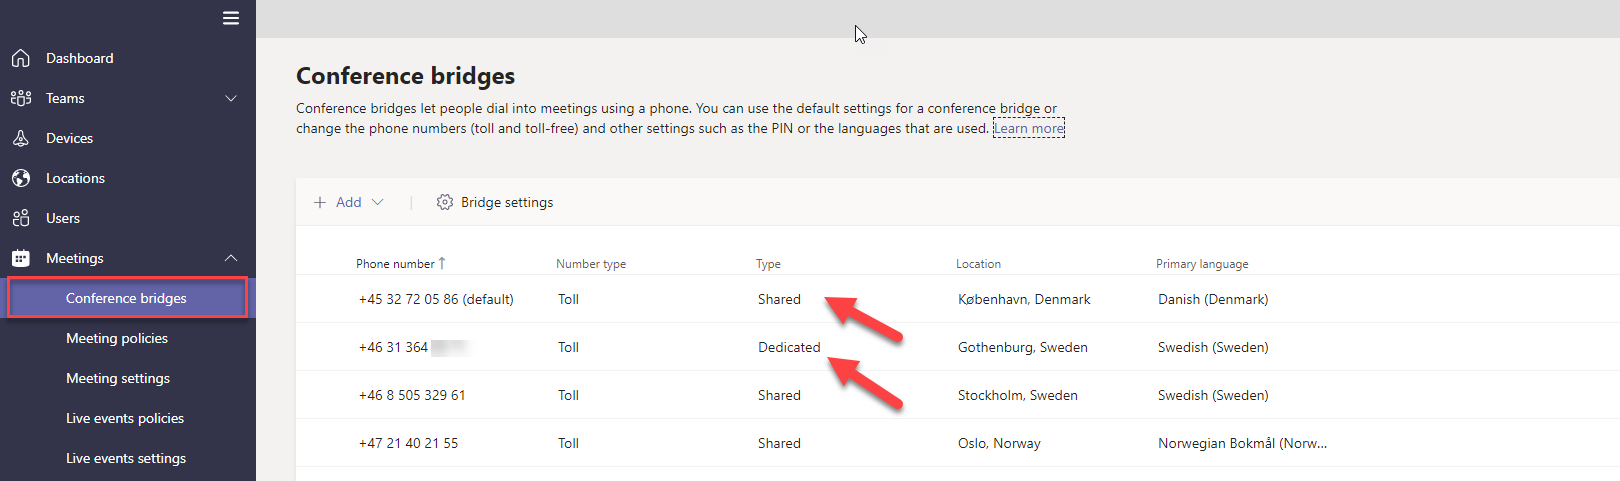
Dedicated phone numbers are those phone numbers that are only available to users within your organization. You can change the languages that are used when someone calls in to one of these numbers.
Shared phone numbers are those phone numbers that can be shared with other Office 365 organizations. You can’t change the languages that are used when someone calls in to one of these numbers.
Toll-free or Toll
You also have two types of numbers, Toll-free and Toll. For some countries there is only one of these options available.
Toll-free numbers will allow your attendees to call your meeting for free, your organization will pay the minute cost for the call using Communication Credits.
Toll numbers are the most common numbers, all shared numbers are Toll numbers, and when an attendee call these numbers they have to pay the cost to the cost to their telephone service operator.
Add new number
In this example we have an request to add a number for United Arab Emirates, we have some customers their that will attend our meetings and they need to dial in the the meeting. In the list of shared numbers there is no number for UAE provided by Microsoft.
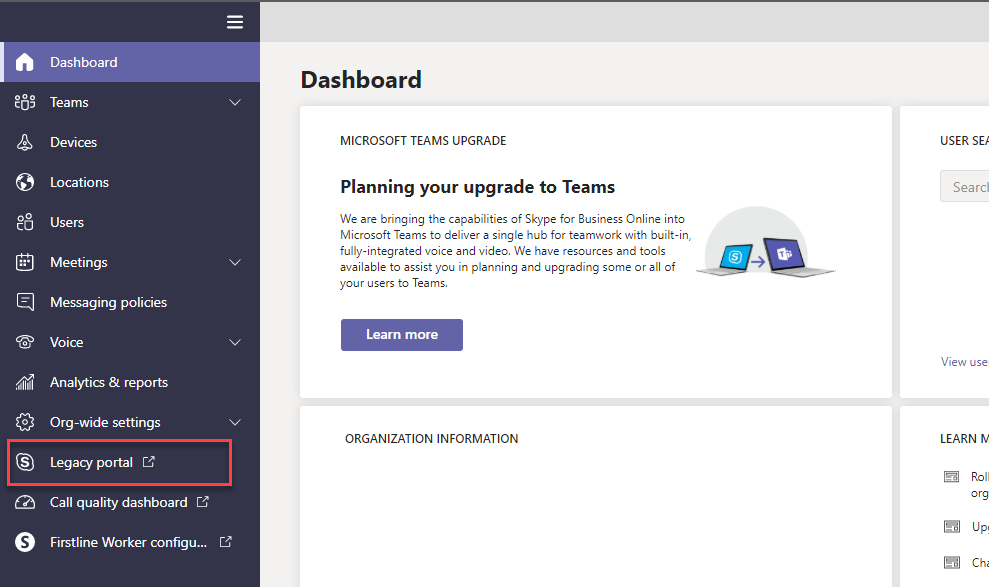
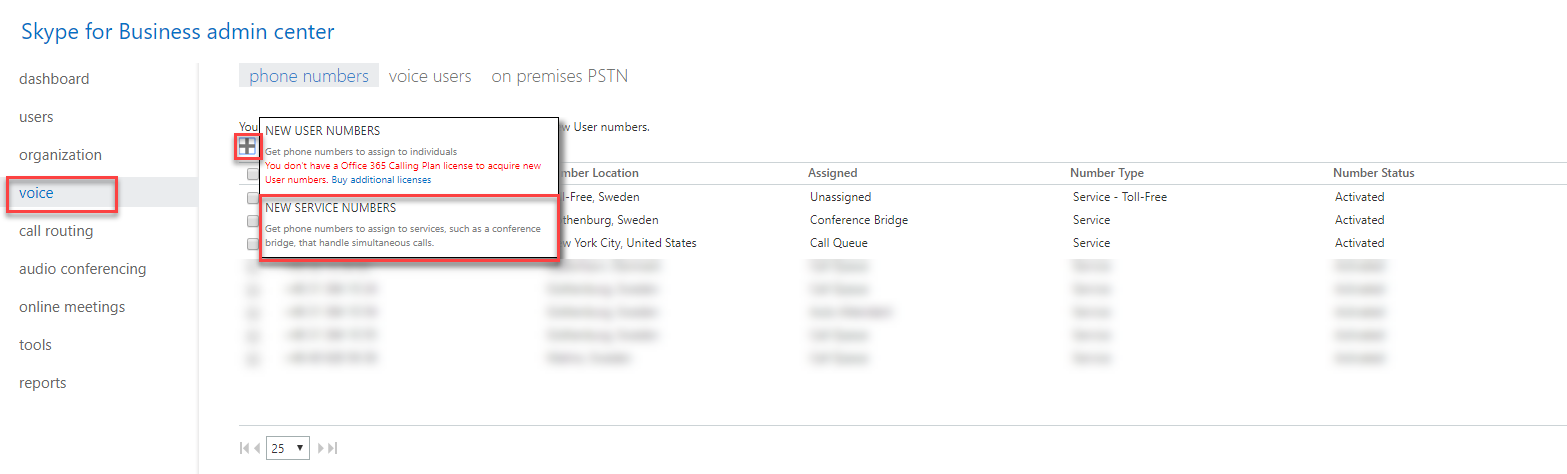
1. Start with opening the Teams Admin Center and select Legacy portal in the left menu.
2. In the Skype for Business admin center select voice in the left menu, then click on the + button and select New service numbers.
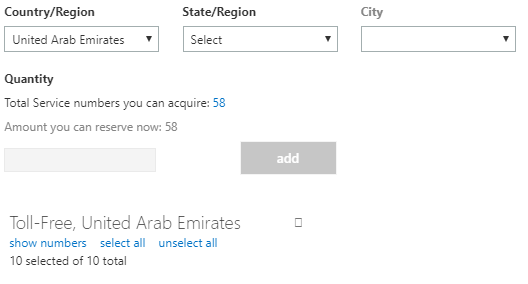
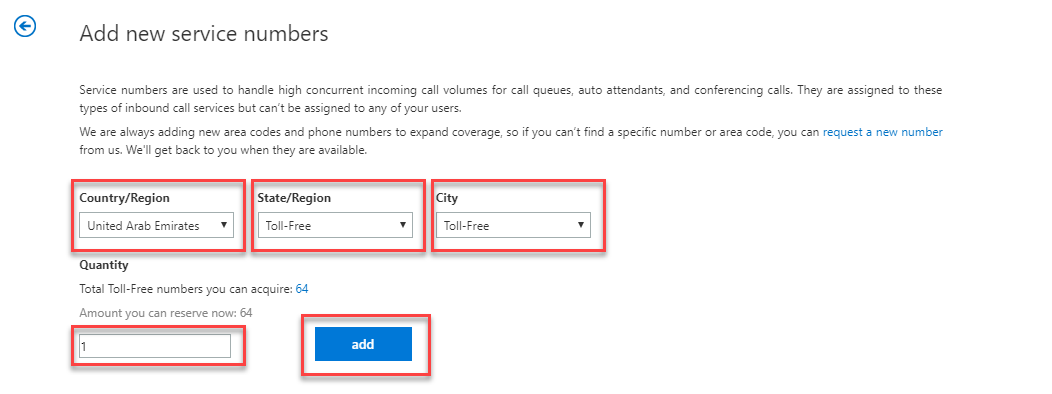
3. Select a Country/Region, then select State/Region and select the City. In this example I will select United Arab Emirates, the only State option I have is Toll-Free and the only City option is Toll-Free.
You also have to select the amount of numbers you want in that City, in this example I select one (1) and then click the add button.
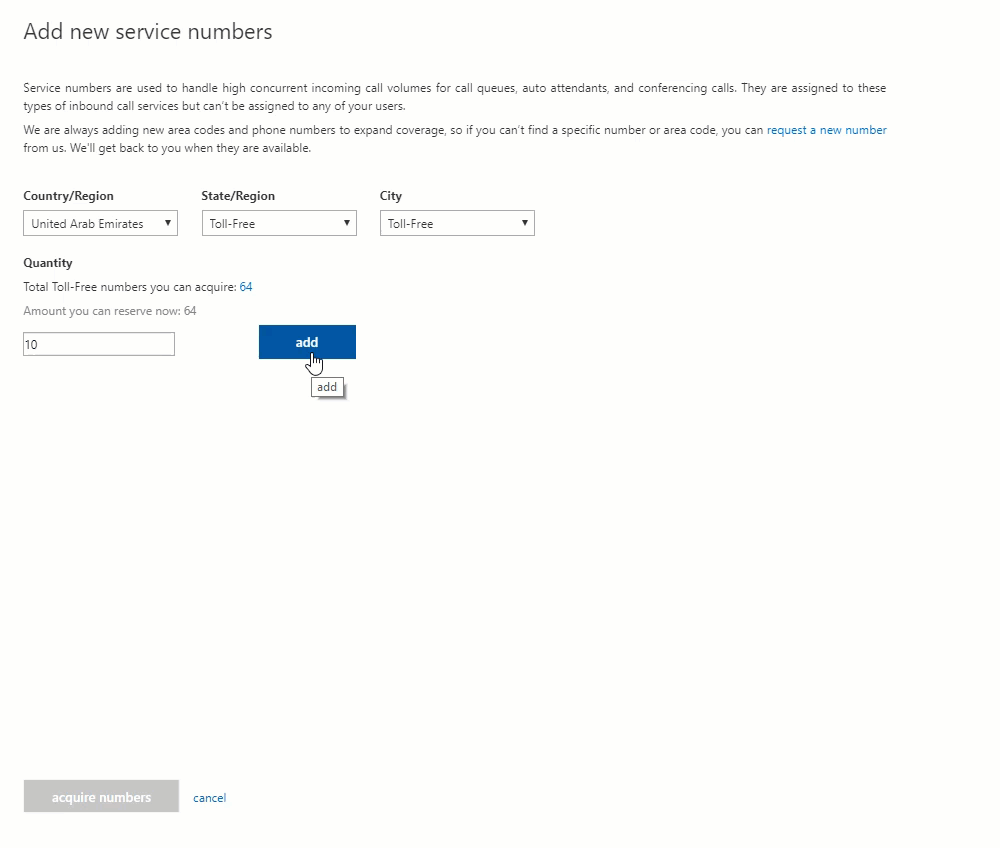
If you want to select the number you can enter a higher number in the Quantity box, so even if you only need one number you can enter 10 and then select one number of ten listed numbers.
4. You will get a list of available numbers when you click on add, click on show numbers and select one of the numbers. Then click on Aquire numbers.
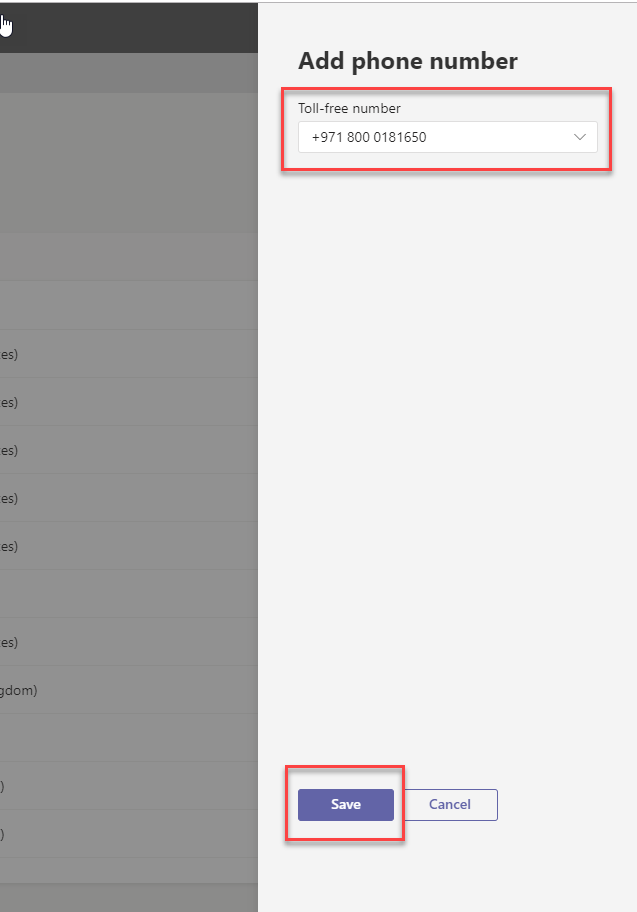
5. Go back to Teams Admin Center and in the left menu select Meetings > Conference bridges. Select Add > Toll-free number / Toll number, in this example I will select Toll-free number.
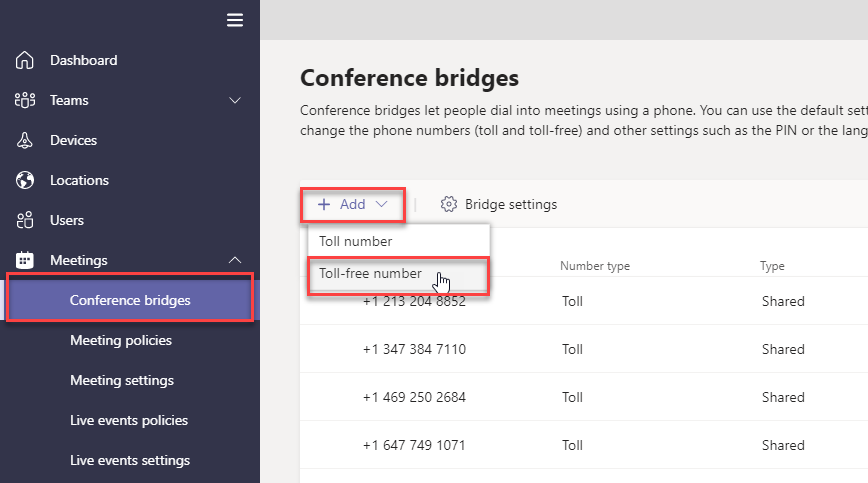
6. In the drop-down list Toll-free number you should see the number you acquired earlier, select that number and click Save.
You should now see the number in the list for local numbers when users create an invite. If not check if Toll-free numbers been disabled for that user. You also need to buy Communications credits for Toll-free numbers.
Service numbers licenses
The amount of service numbers that you get depends on how many Audio conferencing and Phone system licenses you have in your tenant. Example if you have 1-25 Audio conferencing licenses you will get 5 service numbers.
More info here:
https://docs.microsoft.com/en-us/microsoftteams/how-many-phone-numbers-can-you-get
Buy Communication Credits
When someone dials into a Toll-free number your organization have to pay for that call, there is different rates per minutes depending on what country your toll-free number is for. You don’t need communication credits for Toll number since then it is the caller that pays for the calls to the conference bridge.
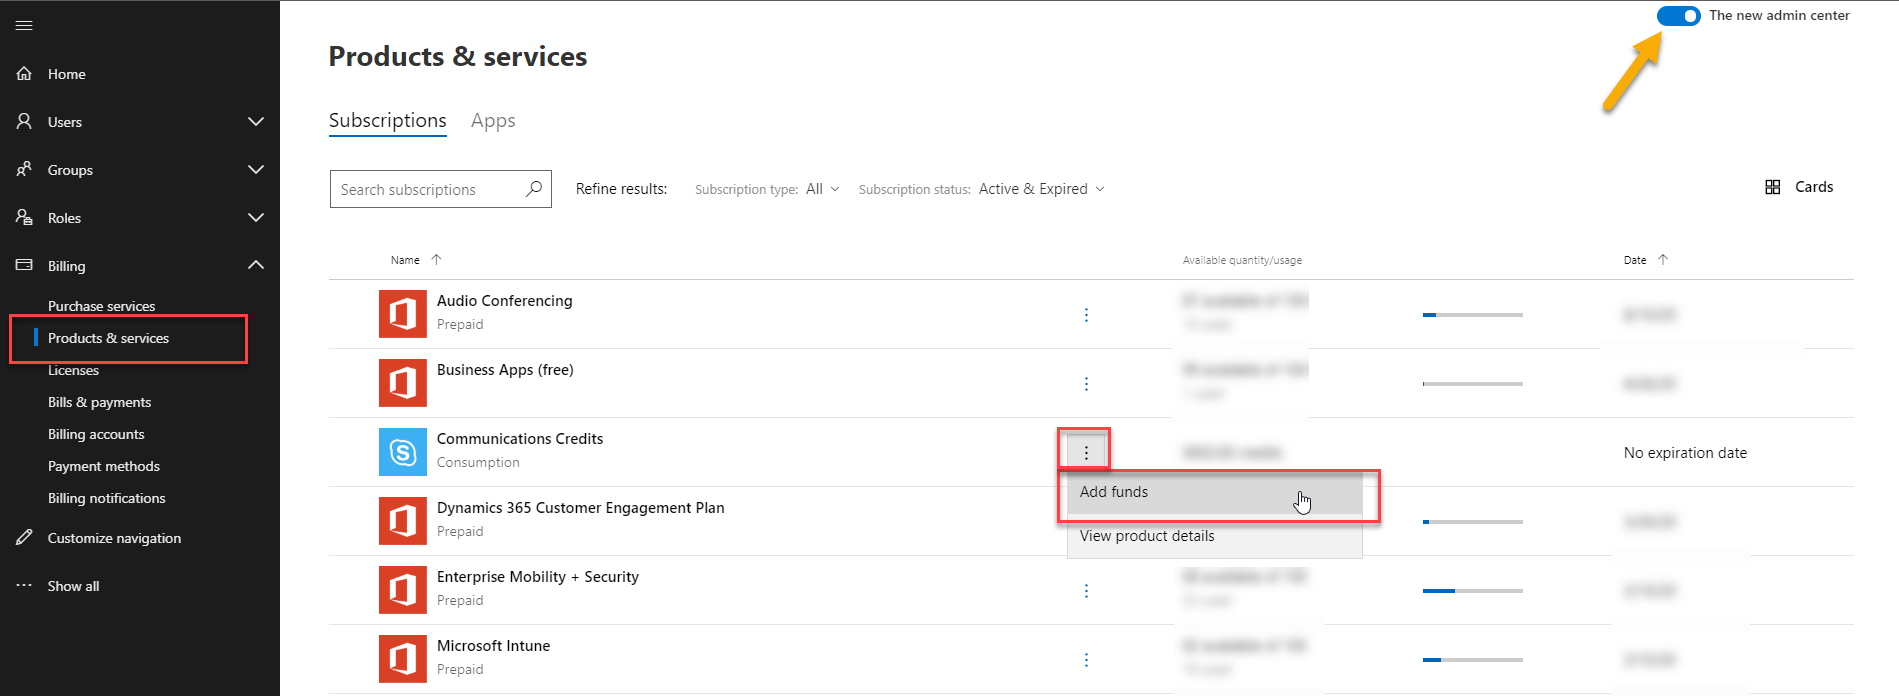
To add credits open Office 365 admin center, this guide is for the “new admin center” so if you are not using that yet turn it on.
1. Open Billing > Products & services from the left navigation menu.
2. Click on the three dots menu next to Communication Credits and select Add funds.
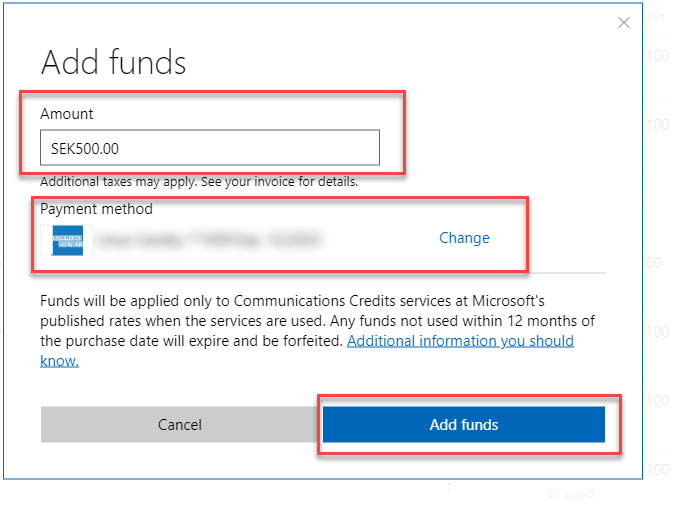
3. Enter an amount that you want to buy in the Amount field. Select a credit card for your payment method or add a new credit card and then click the Add funds button.
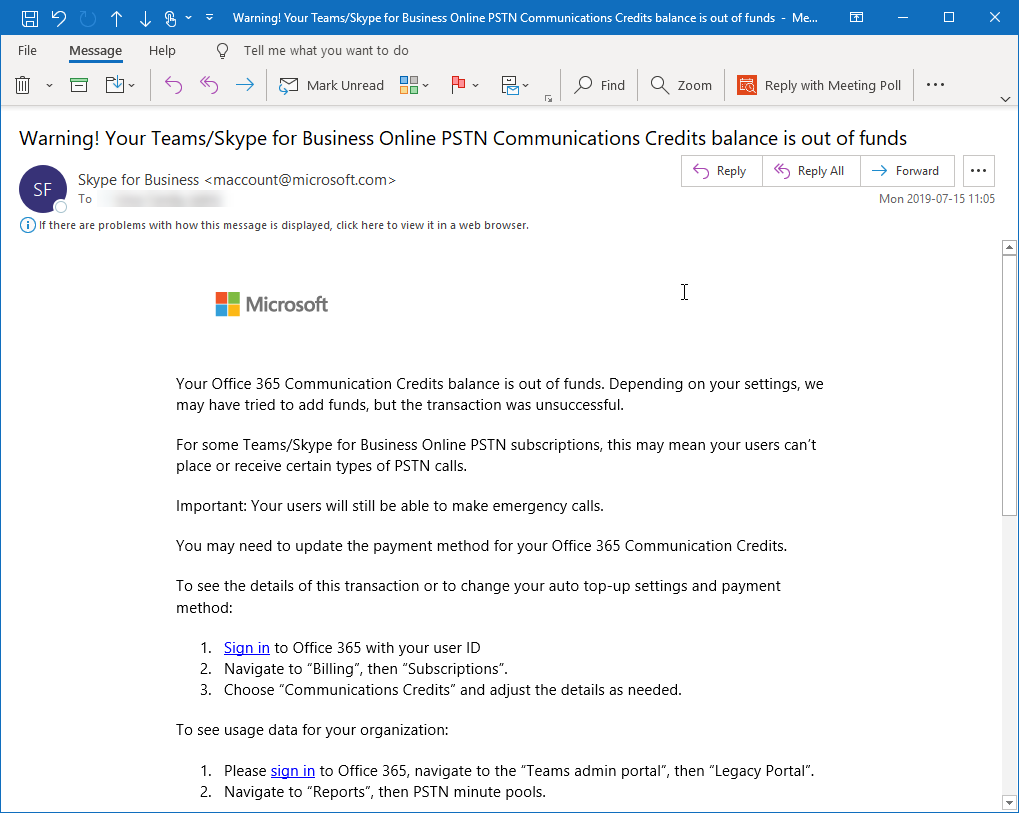
If someone calls in to a Toll-free number and there is no funds left for the communication credits the calls will be disconnected, callers won’t be disconnected until a presenter joins the conference and open the conference or when they admit the attendees to join from the Lobby. Tenant administrator will get an e-mail with an notification that they should add funds.
Auto-recharge funds
If you don’t want that your organization run out of funds for the Communication credits make sure that Auto-recharge is active.
1. Click on the Communication Credits in the Billiing > Products & services section of Office 365 Admin Center.

2. Change to Auto recharge settings tab and make sure that the Auto-recharge switch is turned on. Enter a recharge amount (how much funds you want to add each time) and then enter an amount for When the balance falls below (when your balance is below this amount recharge will activate).
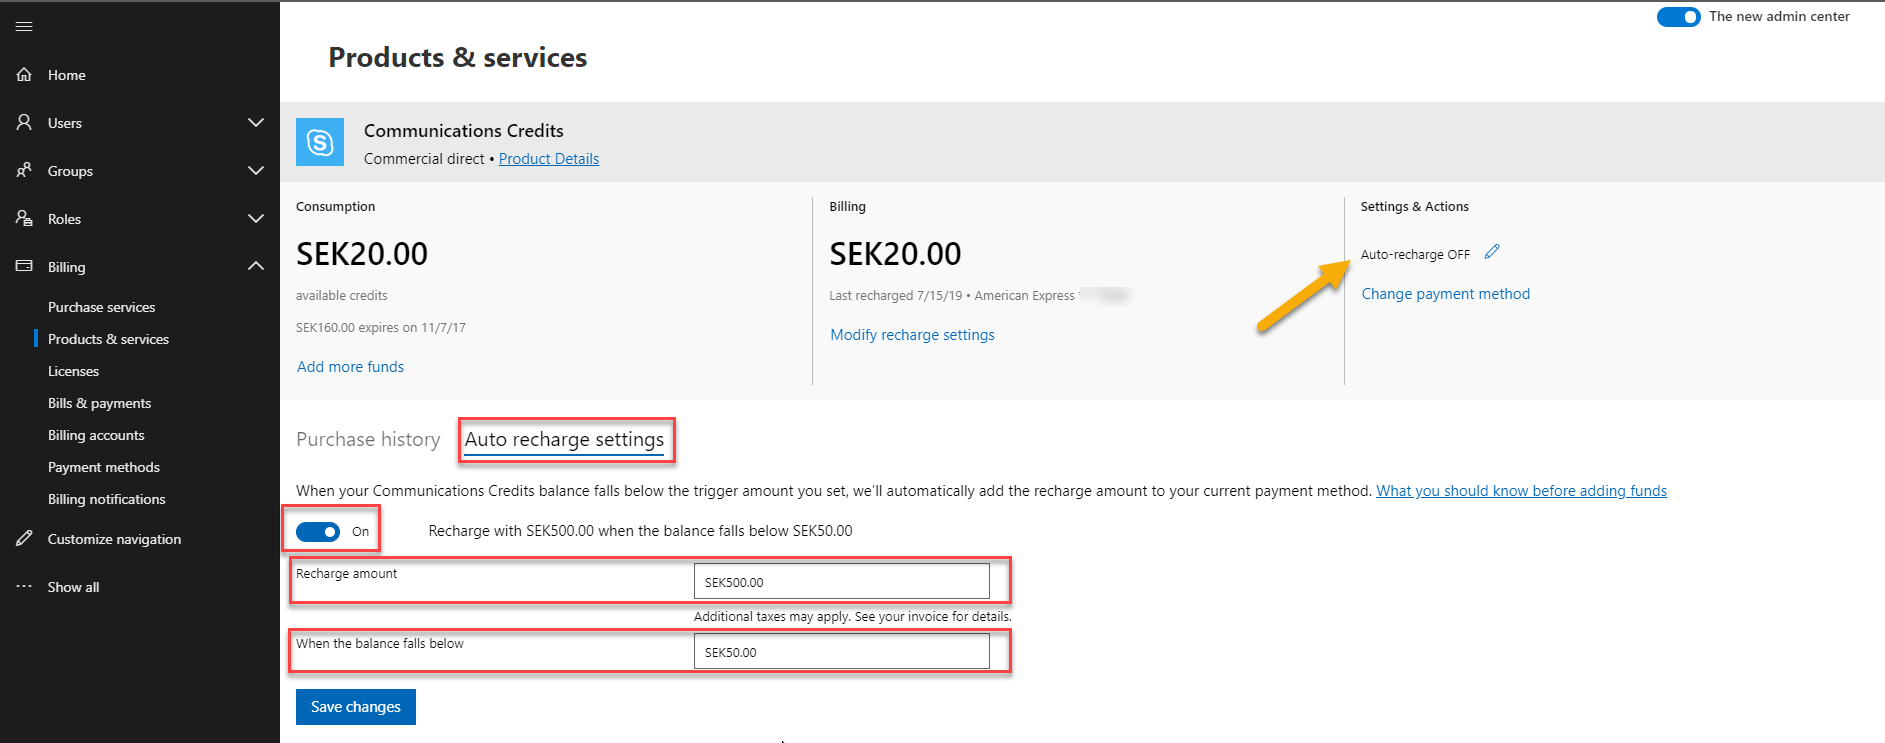
3. Click Save changes button to save the changes.
Rates
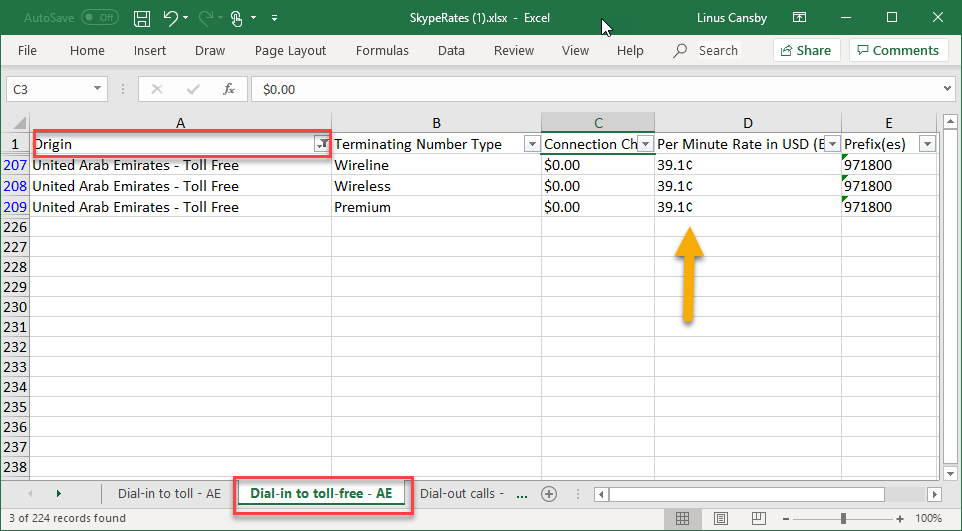
Since you as an organization is paying for the incoming calls per-minute it can be good to keep do a quick estimate when you are buying the Communication credits and when you assign the the Auto-recharge. Microsoft have a web site where you select what country you want the prices for and then you download an excel sheet with all the rates.
1. Open the page in your web browser.
https://products.office.com/en-us/microsoft-teams/online-meeting-solutions
2. Select what Country you want the rates for (location of the Toll-free number). What currency you want the prices in. And select that you want the Pay-per-minute prices. Then click Download rates and that will download an Excel sheet.

3. In the Excel sheet select the Dial-in toll-free tab and use the Filtering function in Excel to filter the Origin (where callers call from). And you will see the rate you pay per minute per attendee calling the toll-free number.
Usage report
To keep track on who is using the credits you can check the PSTN Usage report. Note that you might have to wait a couple of minutes or more before you can see recent calls in the list.
1. Open Teams Admin Center and select Legacy portal from the left navigation menu.
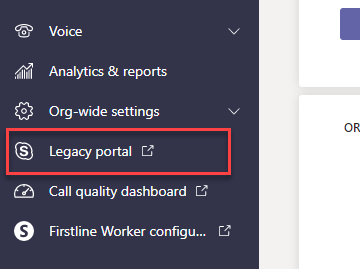
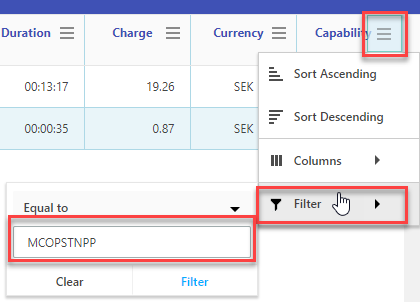
2. Select Reports from the menu and select the PSTN usage details. In the User Id
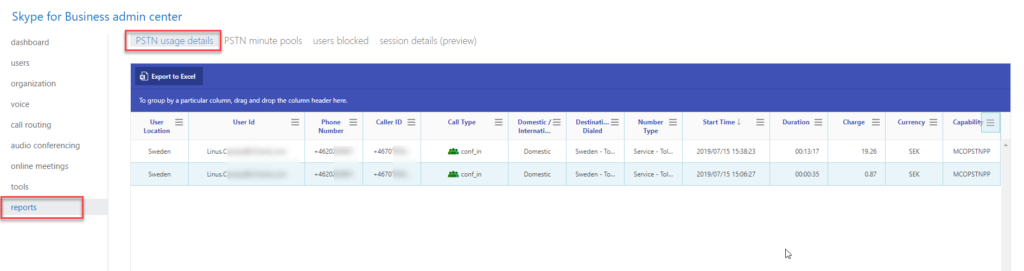
3. Use Filters on Capability to filter out Communication credits usage. Filter on MCOPSTNPP.
Read more about the PSTN usage report here
https://docs.microsoft.com/en-us/skypeforbusiness/skype-for-business-online-reporting/pstn-usage-report
Manage users
You can’t block users from using Toll numbers, all Toll numbers that you acquire to your organization in Skype Online / Teams will be listed in the local numbers list. If you want to limit some users from using Toll-free numbers in their conferences that is possible.
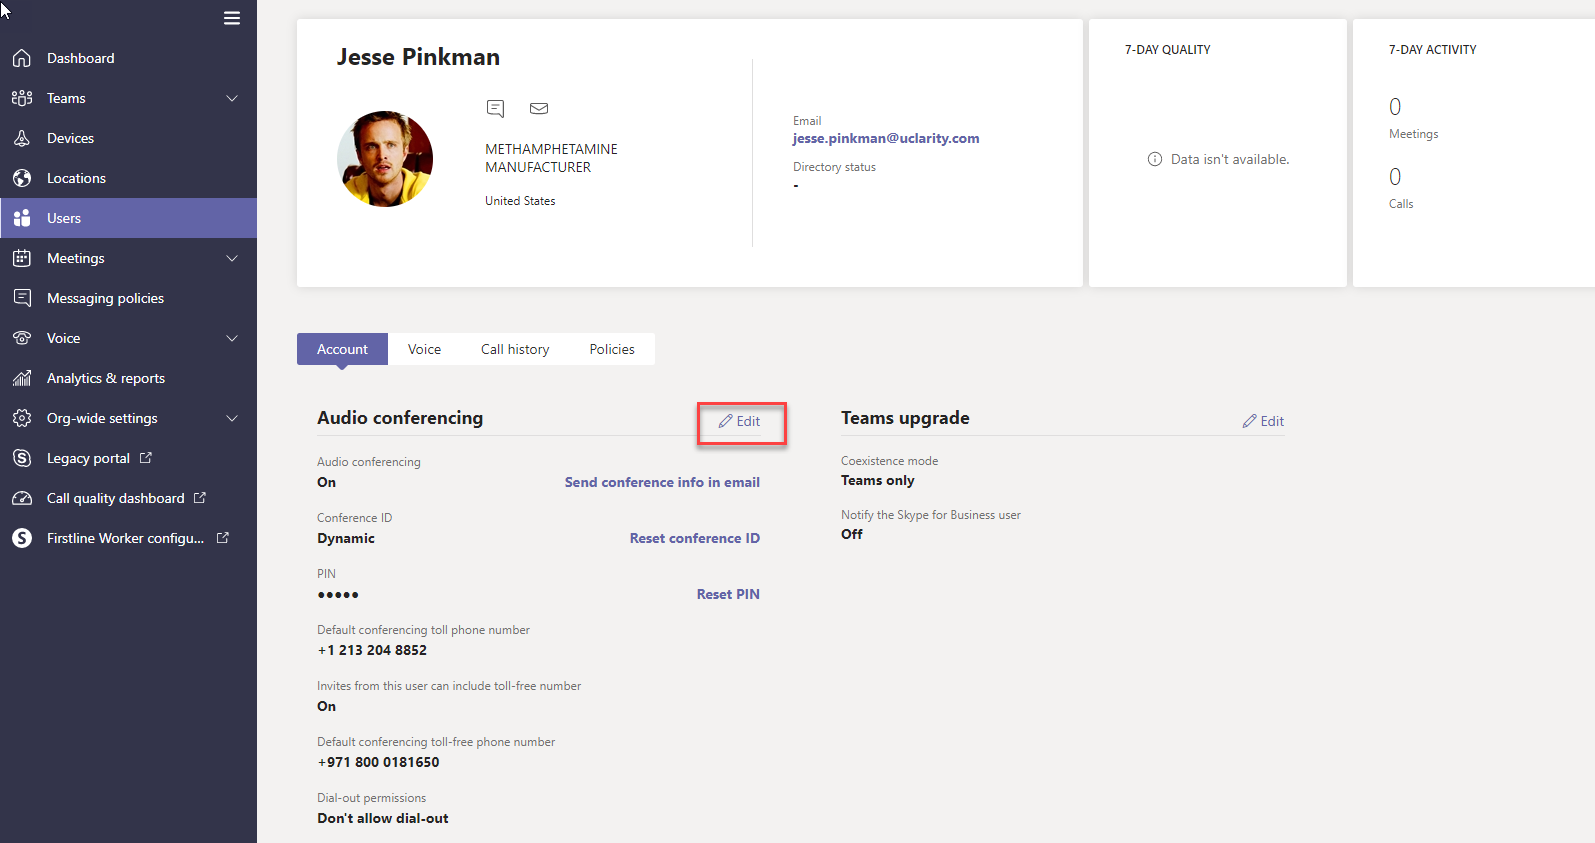
1. Find the user from Teams Admin Center.
2. Open the user and in the Audio conferencing section select Edit
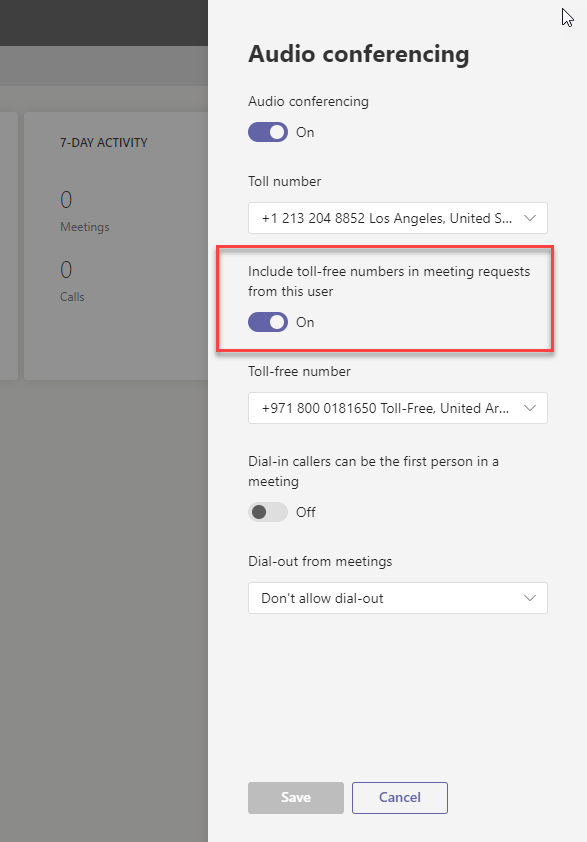
3. Change Include toll-free numbers in meeting requests from this user to Off. This will remove the Toll-free number from the invites and from the Find local numbers page.
You can also use Powershell to disable Toll-free numbers from users.Set-CsOnlineDialInConferencingUser user@contoso.com – AllowTollFreeDialIn $false
Read here about default conference bridge number

M365 Apps & Services MVP | Consultant work at Exobe, based in Göteborg, Sweden. Co-host of Teamspodden, co-organizer of Teamsdagen. Been working with Exchange, LCS, OCS, Lync, Skype, Teams and related stuff for a while. Mostly writing tips and news after getting questions from customers.
Thanks Man, very clear and usefull procedure, this saves my day.
Cheers !
Thanks, happy to hear that it helped you!