This is not the first blog post on internet about this tool but since it is so import that you keep a good network quality for you Skype for Business users and Teams users I will also write about this tool.
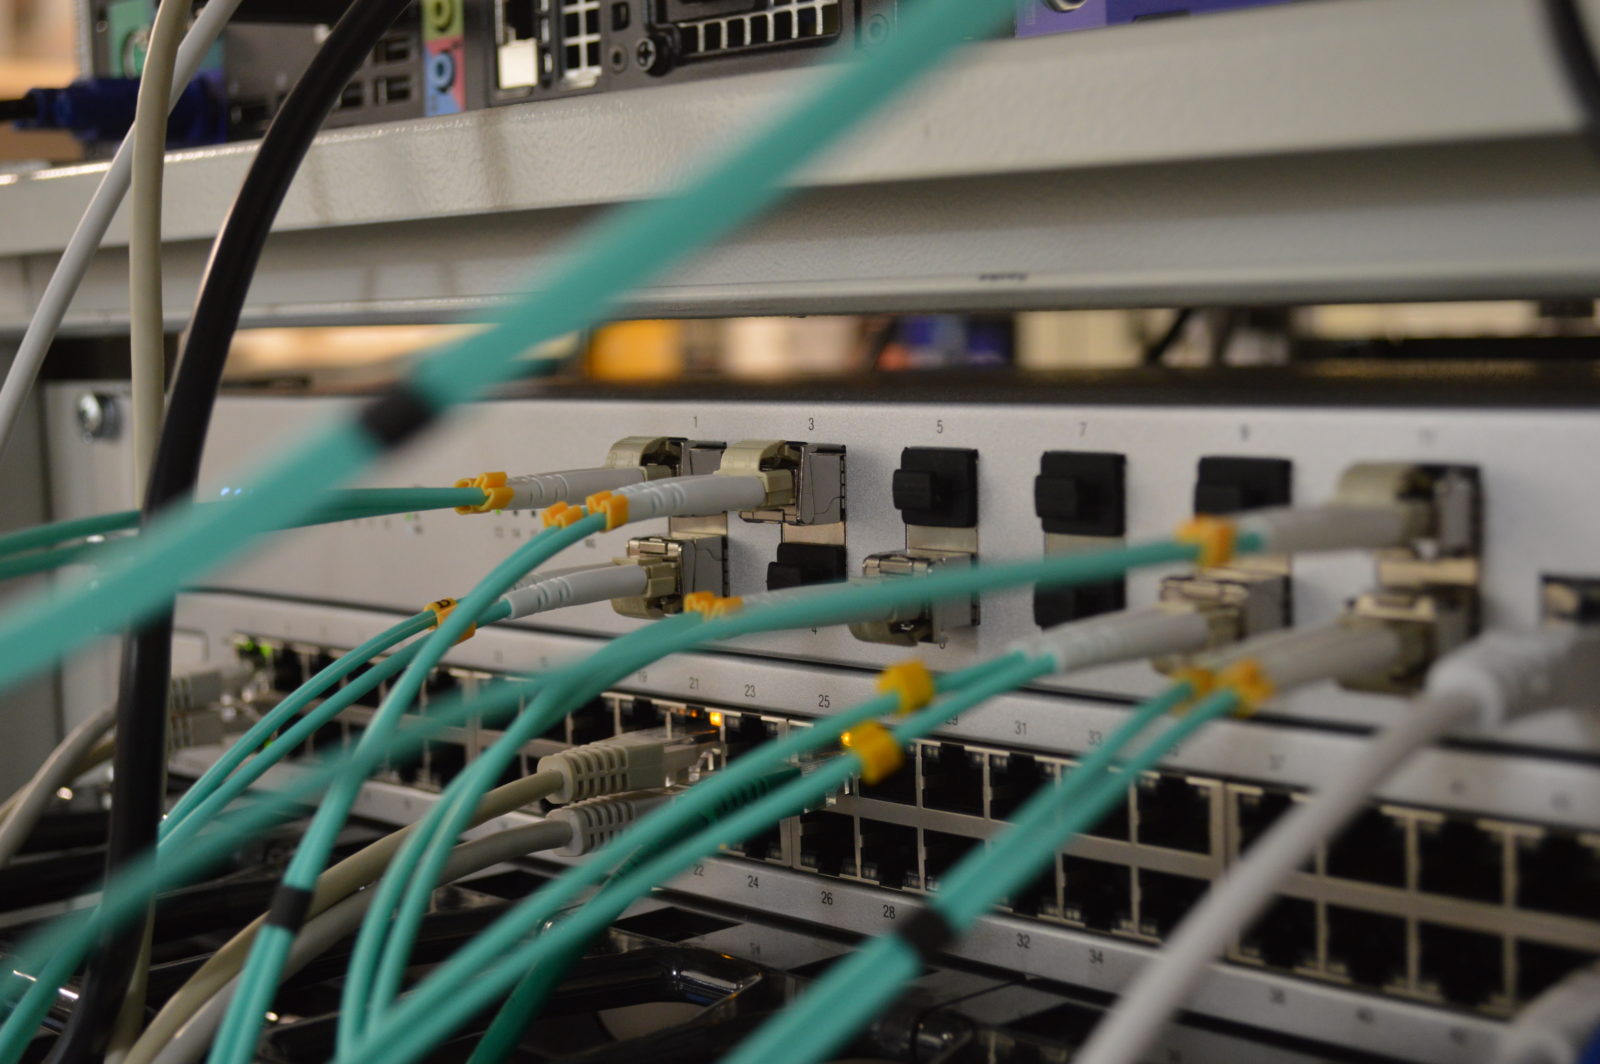
When I’ve been working with customers running Skype for Business network is usually one of the components that causing bad quality in calls and meetings, the other component is bad audio devices. So now when rolling out Teams in organisations we get a new chance to do the homework first and make sure that we give our users a good experience for calls and meetings. Even if users tend to work more from other locations that the office network the majority still use the internal network to reach Office 365 network.
Network Testing Companion is a tool from Microsoft that helps you to perform network quality and connectivity test from your computer. When the tool is installed it is an easy tool that anyone can use. If you have users spread out on different sites within your organisation it is good to have a “Quality Champion” working locally on the different sites that can use this tool to make sure that you have a great network quality from their local site.
Installing Network Testing Companion
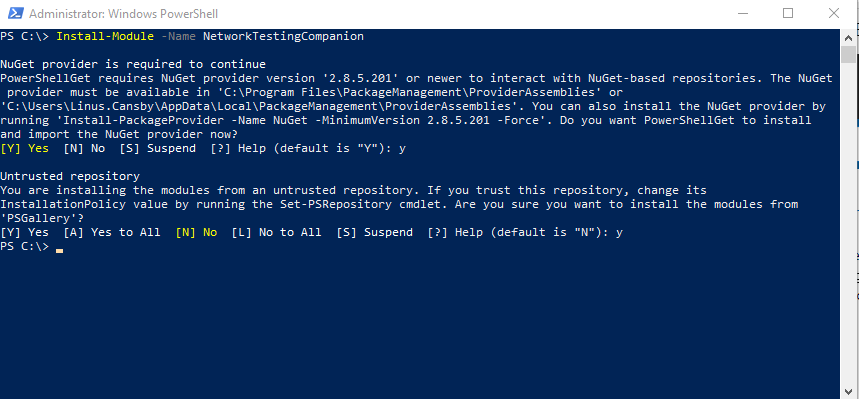
First open PowerShell and run it as Administrator. Execute the command Install-Module -Name NetworkTestingCompanion
The installation process will check if you have NuGet installed in the correct version and ask if you want to install it if it is not installed yet. You can also get an warning that you are installing from an untrusted repository. Type y on both questions to continue.
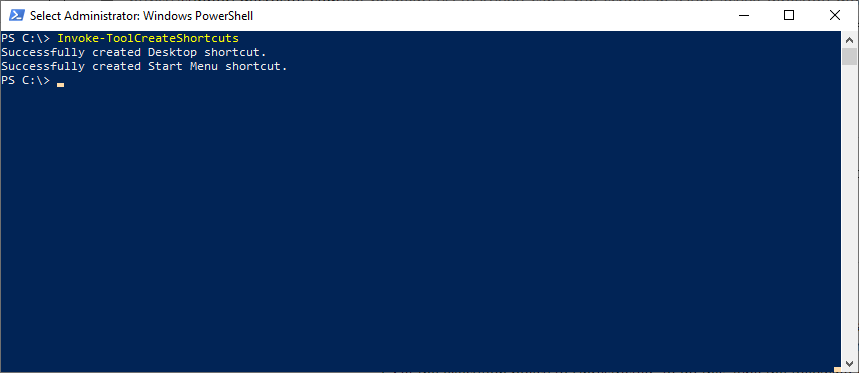
The next step is to create shortcuts, you do this with Invoke-ToolCreateShortcuts.
Run Network Testing Companion
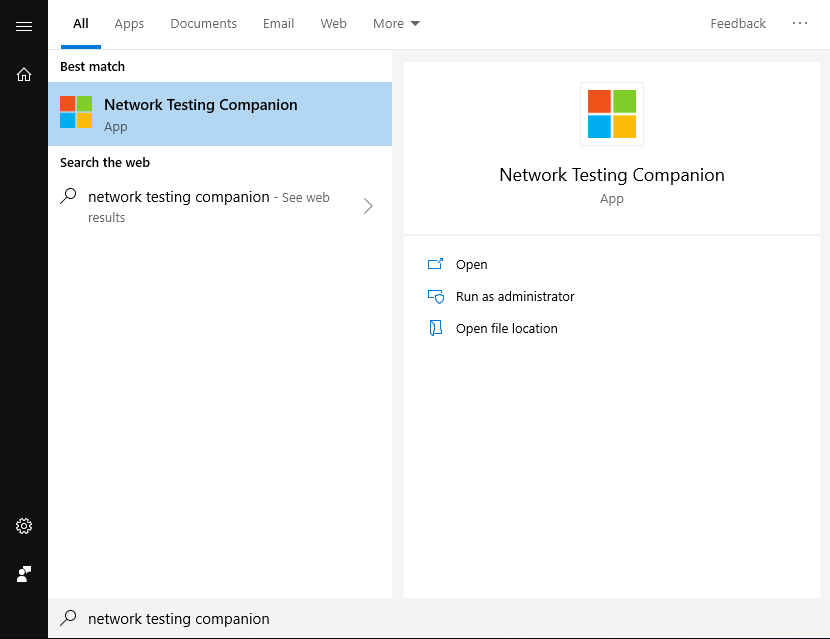
When the installation is done you should be able to find NTC in the Start menu, search for Network Testing Companion and run the application.
At the first start NTC will check so that you have Network Assessment Tool installed (a tool that is used to do the network tests) and if something is missing you will see the green Install button, press it and NTC will take care of the installation.
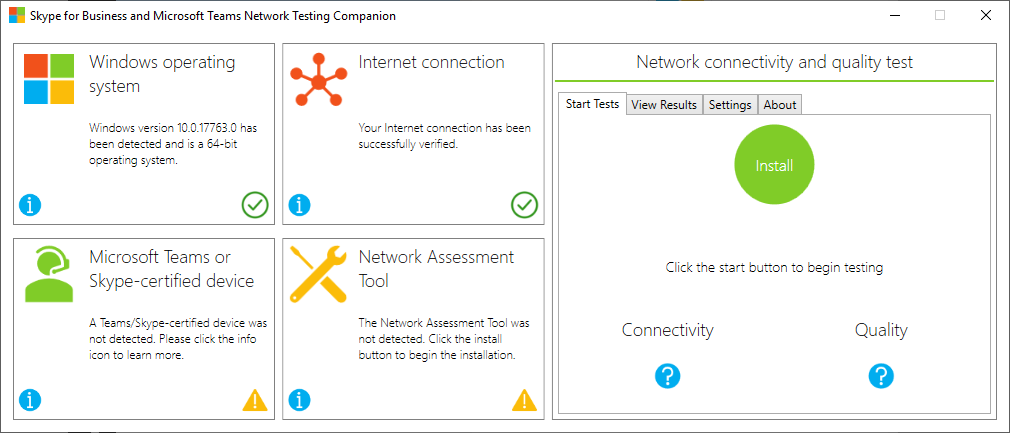
When you see the green Start button you are ready to go, make sure that you shutdown all other applications so that you don’t have anything else taking bandwidth. Press the green Start button to start the test. NTC will first test connectivity to known Teams servers and then start to testing the quality by sending a audio file to Microsoft edge servers, so we send traffic to the relay servers fronting Teams servers.

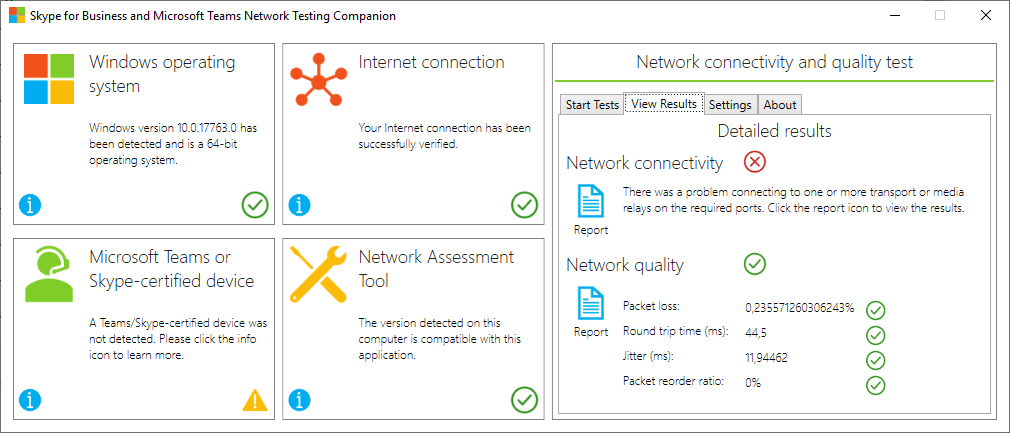
When the test is done you see a red cross if any of the two tests failed or if everything was good you would see a green check icon. To see more details of your tests select the View Results tab. You can click on the reports icon to see more details of each test.
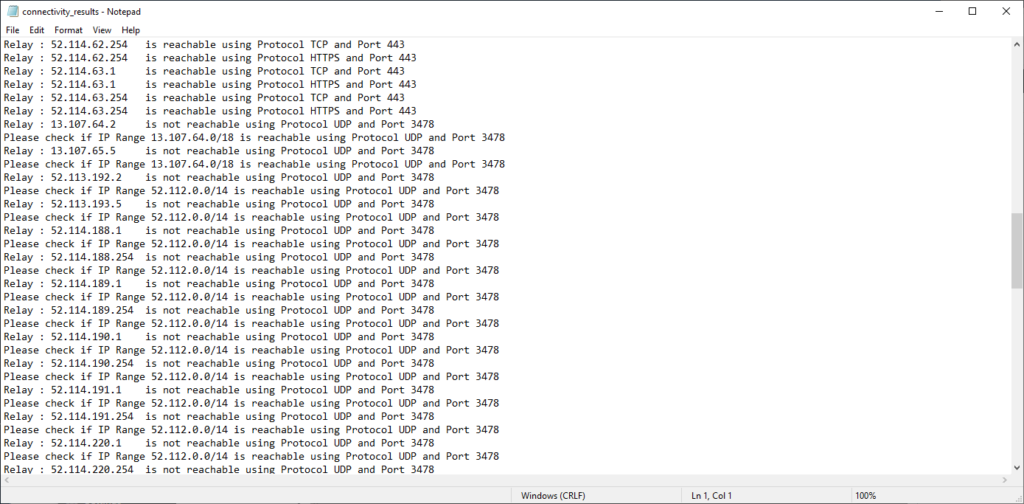
In this example there was a network connectivity error so we open the Report and check it out, click the Report icon to open the report.
The report will open up in notepad and in it you will see a list of addresses and ports NTC tried to access. Use this list when talking to your network team and make sure that they open communication to all addresses and ports listed on the page Office 365 URLs and IP address ranges.
Even if the Network quality test was green in this test we should check the report. Here we can see that for a end user client the test was good, but if we were running this test from a computer connected close to our internet connection (network Edge) the package loss rate was to high.
Running multiple tests
Since network quality can go up and down during a day we could also use Network Testing Companion to do some longer tests. If you don’t do any changes one test will take 40-50 seconds, depending on how long connectivity tests take.
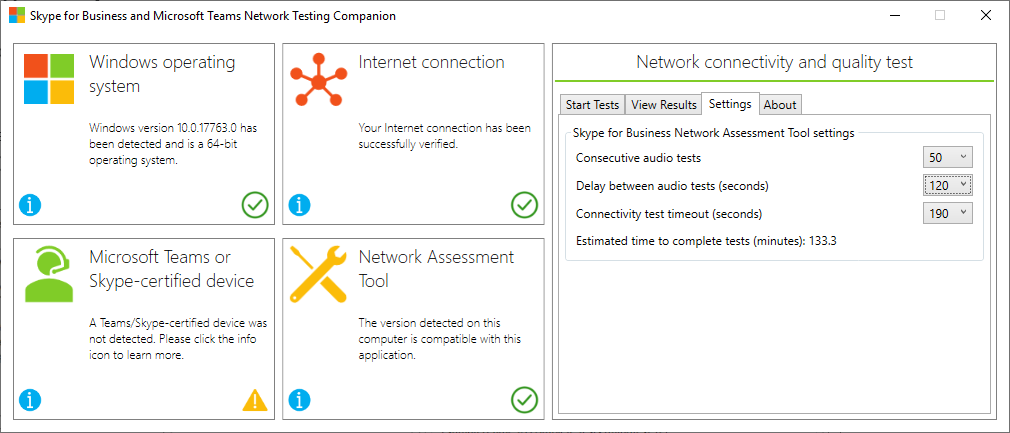
Select the Settings tab and change how many Consecutive audio tests you want to do (1-50), sen select the Delay between audio tests (1-120 seconds) and then select how long each test should be in the Connectivity test timeout (90-190 seconds). If you set all these to the maximum you will run tests during 1,5 hours.
Sometimes 1,5 hour tests is not enough to find the problem or you want to find other errors, maybe the path is changing constantly or you have a proxy blocking traffic, then you should contact a partner that can do a network assessment test that runs for many days instead with tools that can see more statistics. One of them is the UCReady test.
Network preparation
The tests we did with Network Testing Companion measures quality by sending a audio file to a Microsoft Edge (the connection point connecting Microsoft network to Internet). When measuring you should check that you are below the numbers in the figure below.
| Value | Client to Microsoft Edge |
| Latency (one way) * | < 50ms |
| Latency (RTT or Round-trip Time) * | < 100ms |
| Burst packet loss | <10% during any 200ms interval |
| Packet loss | <1% during any 15s interval |
| Packet inter-arrival Jitter | <30ms during any 15s interval |
| Packet reorder | <0.05% out-of-order packets |
If you get higher number than this check the following:
- Network drivers can be old on the computer that you are testing from and that can give you a bad test result.
- Local egress point is better than a central, this is were your traffic exits your network and go out on internet to find the closes Microsoft network peering location. You always want to come it to Microsoft network as soon as possible since their global network is optimised for this traffic.
- Internet Exchange Points is were different Internet Service Providers connect to each other, make sure that you use an ISP that is connected to an Exchange Point were Microsoft is connected to minimise the numbers of hops on Internet. You can check it in the PeeringDB.
- Firewall ports 80 and 443 and UDP ports 3478 through 3481 from the clients to the internet have to be open to get an good experience.

M365 Apps & Services MVP | Consultant work at Exobe, based in Göteborg, Sweden. Co-host of Teamspodden, co-organizer of Teamsdagen. Been working with Exchange, LCS, OCS, Lync, Skype, Teams and related stuff for a while. Mostly writing tips and news after getting questions from customers.

I can’t create a shortcut. Why can you explain?
Unable to save shortcut “C:\Users\******\Desktop\Network Testing Companion.lnk”.
At C:\Program Files\WindowsPowerShell\Modules\NetworkTestingCompanion\1.5.5\NetworkTestingCompanion.psm1:1408 char:9
+ $Shortcut.Save()
+ ~~~~~~~~~~~~~~~~
+ CategoryInfo : OperationStopped: (:) [], DirectoryNotFoundException
+ FullyQualifiedErrorId : System.IO.DirectoryNotFoundException
You can create “Desktop” folder in “C:\Users\username”, and then move the .lnk file wherever you like. Then delete Desktop folder.
@Tauri Eha
Most likely it’s due to your Desktop folder being redirected to OneDrive.
If you open the file “C:\Program Files\WindowsPowerShell\Modules\NetworkTestingCompanion\1.5.5\NetworkTestingCompanion.psm1”, you can run the code inside the function to create the Start menu shortcut.
It might be a bit cumbersome if you’re not local admin; you first have to run the script to download and install the app, then run the code i was talking about above as your own user, otherwise the shortcut will be installed in the local admin folder.
Basically, as your regular user, run the lines 1395-1399 first, then lines 1419-1425.
After i tried to invoke shortcut, this is what i got.
Invoke-ToolCreateShortcuts : The ‘Invoke-ToolCreateShortcuts’ command was found in the module
‘NetworkTestingCompanion’, but the module could not be loaded. For more information, run ‘Import-Module
NetworkTestingCompanion’.
At line:1 char:1
+ Invoke-ToolCreateShortcuts
+ ~~~~~~~~~~~~~~~~~~~~~~~~~~
+ CategoryInfo : ObjectNotFound: (Invoke-ToolCreateShortcuts:String) [], CommandNotFoundException
+ FullyQualifiedErrorId : CouldNotAutoloadMatchingModule
First try the command: Set-ExecutionPolicy Unrestricted
Thanks for the great article. How do I use the tool in VDI environment in which the audio and video traffic will redirect to the local PC. Should I run the test on VDI machine or local PC? Please advise.
Hello, I am also interested in this topic. Do you have information ?
You should test on the local PC since the audio and video traffic will go between Teams services and the local PC.
Hello,
When running the test i get an error message saying: There was an error exporting the results: You cannot call a method on a null-valued expression.
Any idea how to solve this problem?