I noticed some questions about the calendar in Teams so now after I’ve tested the new enhanced scheduling experience I decided to write some about the calendar in Teams. In some documentations the Calendar button is called Meetings, this was the old name but now it is called Calendar. With this app in Teams you should be one step closer to getting rid of Outlook, maybe…
Calendar view
You open the Calendar from the Calendar app (1) in the left menu. You will then see this view (but I hope you have other appointments) and maybe you are not running in dark mode.
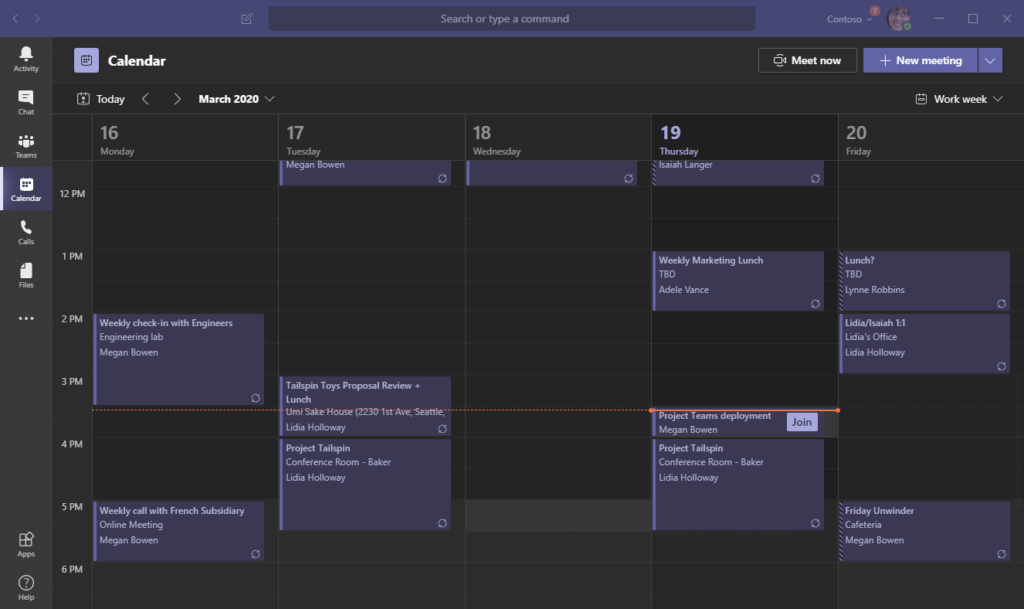
You get an overview of all your meetings and they should be the same as you see in Outlook since both Outlook and Teams reads from your calendar in your Exchange Mailbox.
There is a line (2) showing you the current time and the current day is marked in another colour, todays date and weekday (3) is also in another colour.
You can select what view you want (4); Work week, Day or Week. Work week shows 5 days, Day only shows one day and Week shows the whole week. If you want to change week use the arrows (5) or select a date to jump to with the date picker (6).
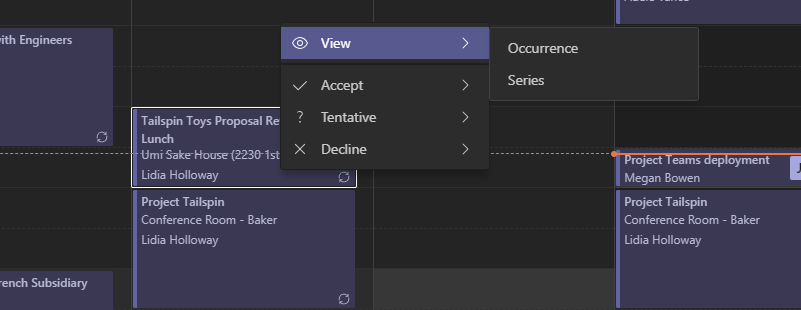
Right click on a meeting and you will see and menu where you can view the meeting or select if you will attend or not if you were invited. If it is a reoccurring meeting you get the option to do your action for only this occurrence or if you want to do it for all occurrences in the series.
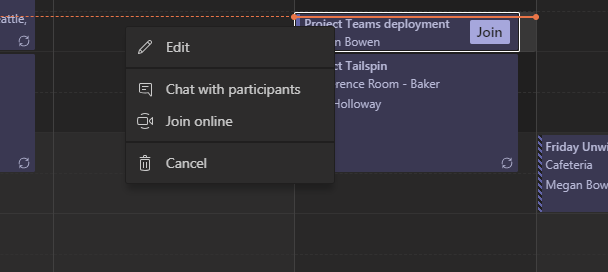
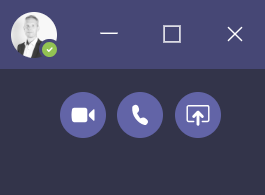
If it is a Teams meeting you will see the Join button (click it to join the Teams meeting). But you can also right click on the appointment and select Chat with participants before the meetings starts (and after the meeting) and Join online. If you are the organizer of the meeting you will also be able to Edit it and Cancel it from this menu.
View a meeting
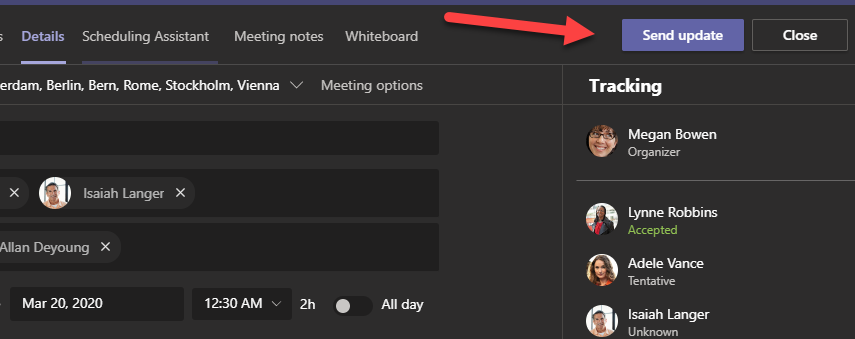
When you open in Teams Calendar you will see this view if you are the organizer.
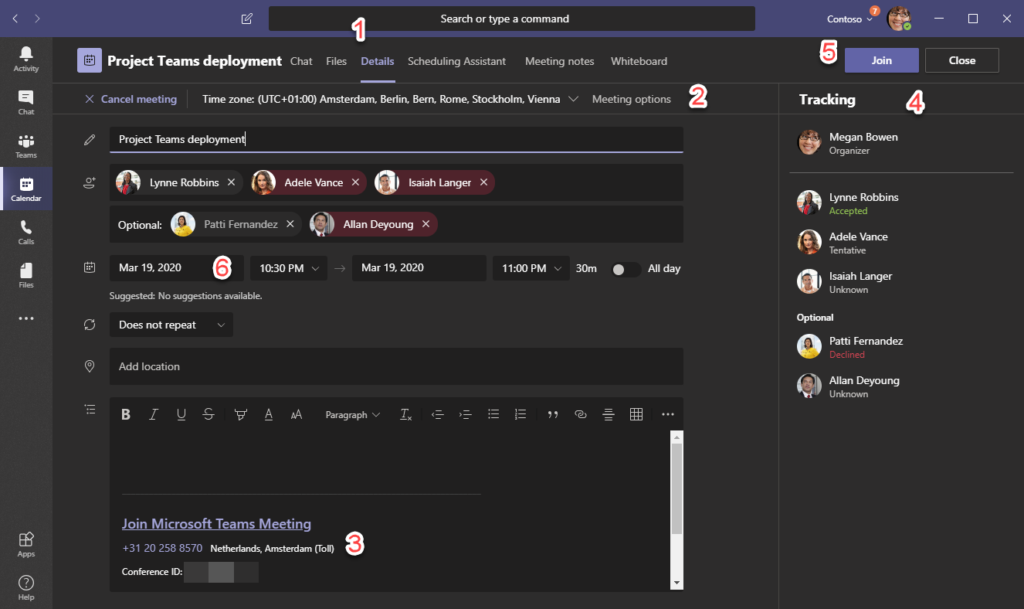
Since it is a Teams meeting we can see (1) Chat, Files, Meeting notes and Whiteboard here. So you don’t have to join the meeting to start sharing content, you can prepare the meeting attendees by uploading files that you will discuss, start drawing on the whiteboard and chat with the other attendees as soon as the meeting is scheduled.
If you want to change who should be an attendee and who should be a presenter in this Teams meeting click on Meeting Options (2). In meeting options you can also change settings for the meeting Lobby.
Since it is a Teams meeting you see the meeting information in the details (3) and you can join the meeting just by clicking the Join button (5).
You also have tracking in this view. When someone accepted or declined the meeting you can see this right below their name. If you have required attendees that declined you might want to reschedule, optional attendees is usually okay if they can’t attend the meeting since they are optional. Change the date (6) and the join button (5) will change to Send update, click on that to send out the update.
Schedule a meeting
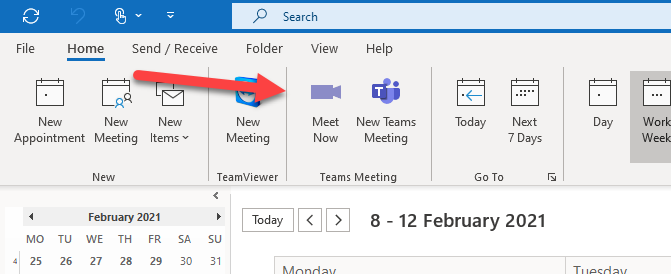
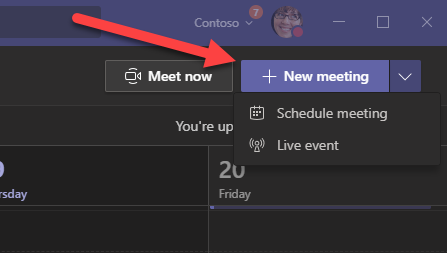
To schedule a meeting double click anywhere on a free time slot in the calendar or click on New meeting, this will start Schedule meeting.
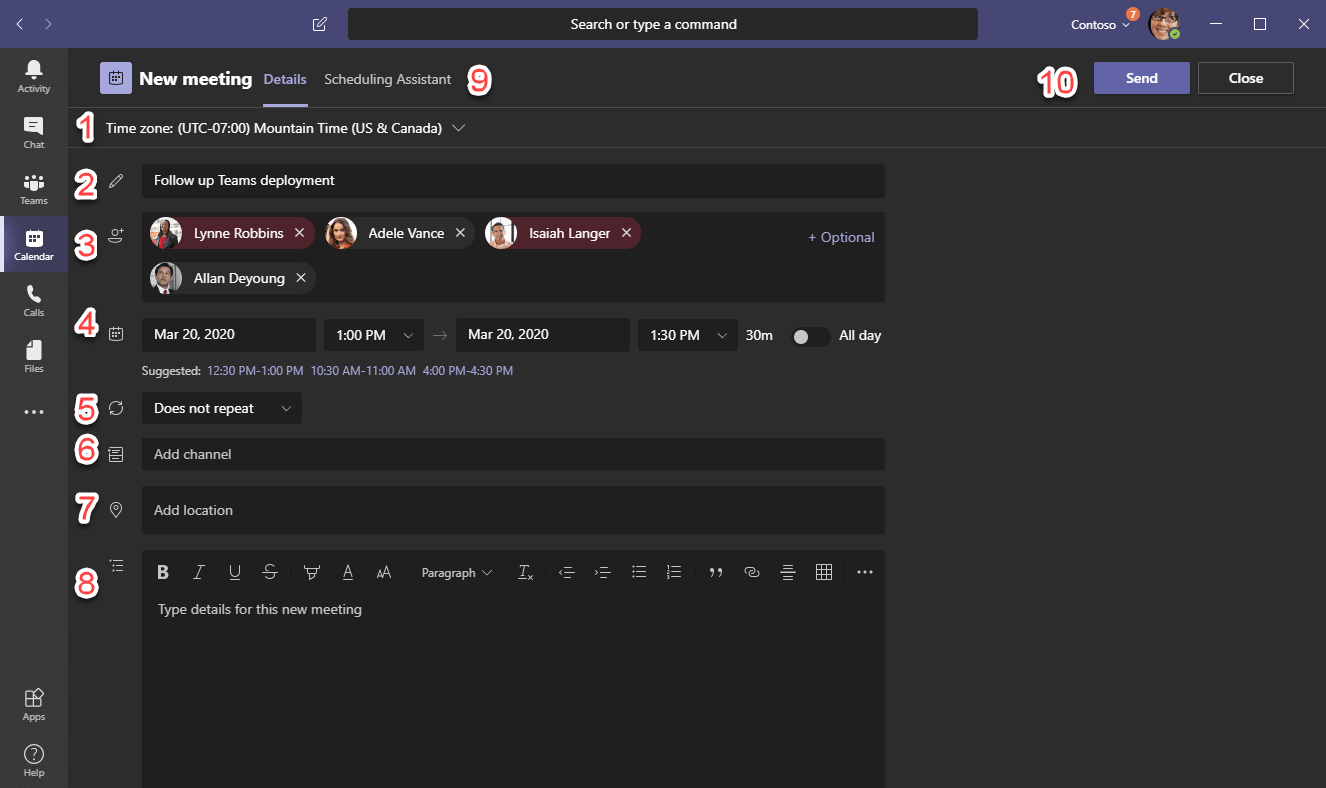
A new view opens and you should see something like this, but here I’ve already started to enter some information.

If you are scheduling at meeting with people from another timezone you can change Time zone (1). The default time zone will be the one you have set in Windows.
Then enter a Title (2) for the meeting.
Enter the names of the participants that you want to invite (3), while you are typing you will get suggestions from your company address book, you can also enter the full email address of an external contact. You can also click on Optional to get a field for optional attendees if you want the separate required and optional, this is only to get a better view of them. Note that you can’t add distribution lists here.
Select the date and time (4) for the start and ending of your meeting. When you changes this you can see that the names of the attendees changes to red if they are are busy that time, so you don’t have to change to Scheduling Assistant to get that information.
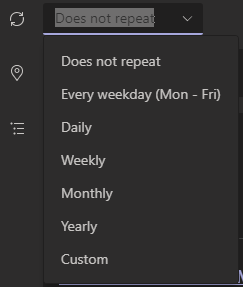
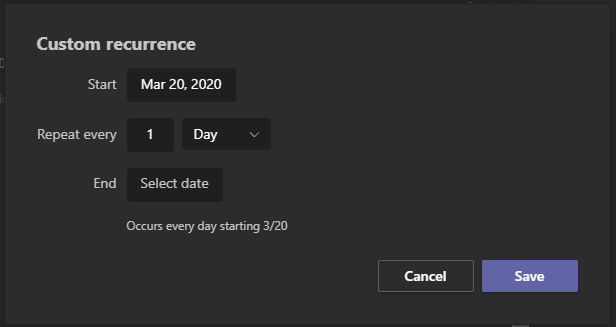
If you want your meeting to repeat you can select this from the drop down (5). You can select a predefined repeat schedule or enter a custom schedule.
You can invite a whole channel to the meeting (6). It is not possible to invite private channels and you have to be member of the Team that the channel belongs to. Members of the Team will not get anything in their calendar if you only invite the Channel. Note that if you edit a meeting you can’t add a Channel, you have to add Channels when you create the meeting, once it is sent you can’t add a channel.
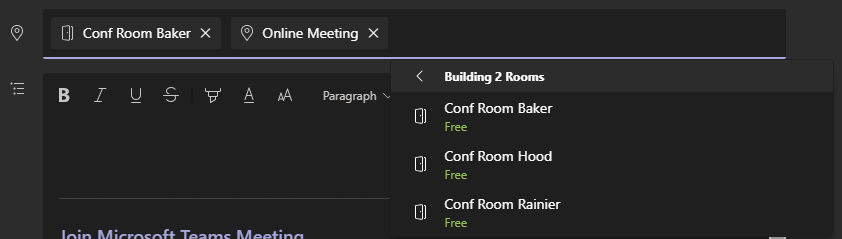
In the location you can write free text like “Online meeting” or an address, but you can also add a room here. You can also use a combination of free text and rooms from your directory. When you click in the Location field (7) you should see a drop-down where you can select rooms and see if they are available, you can add multiple rooms.
In the details for the meeting (8) you should write some information about the meeting and add an agenda so everyone knows what you will discuss during the meeting.
If your attendees are internal and they show as red when you add them to your meeting (3) you can use the Scheduling Assistant (9) to get an overview of their calendars. Find a free time slot and click on that. By unticking View my work hours you will see time slots for the whole day.
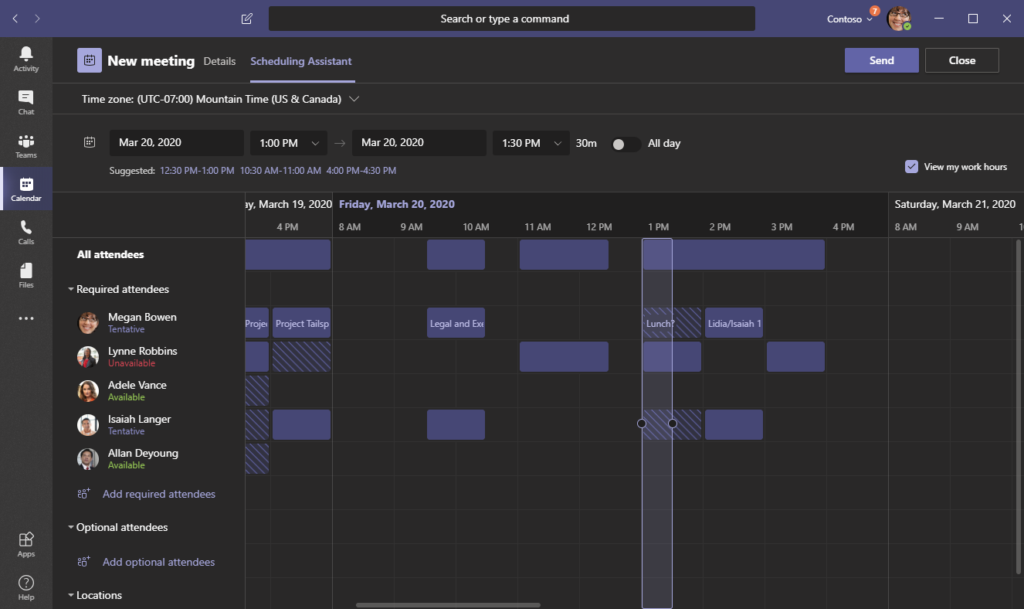
When you have entered all information click on the Send button (10) to send the meeting request. When you invite others it will automatically be a Teams meeting when you send it. So you have to send the meeting before you can see Teams meeting information like Audio Conferencing numbers or change Meeting Options.
Channel meetings
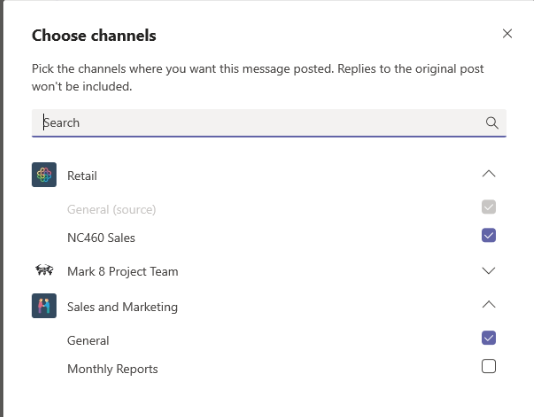
When you invite a channel to a meeting the meeting will be posted in the Channel.

Meet now
The meet now button in the Calendar will create an ad-hoc meeting. So this won’t schedule a meeting, instead it will start a new Teams meeting. When you have started the meeting you can invite others directly into the meeting.
Inviting externals
When you invite someone external write their e-mail address. They do not have to be in a team or be a guest in your tenant, they don’t even need a Teams license or Teams application to join the meeting – they can use Teams Web Application.
Invited channel
If you are a member of a channel that gets invited to a meeting and you want to add that invitation to your calendar just open the meeting invite in the channel and select “Add to calendar”.

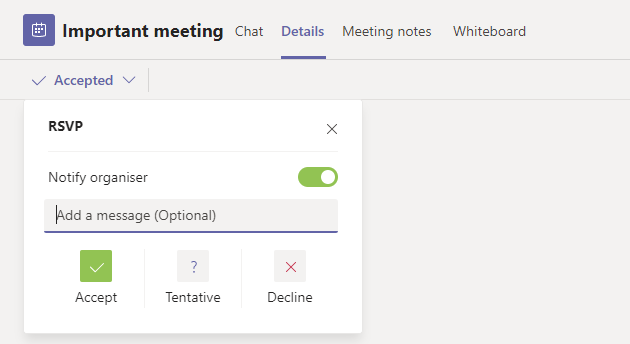
You can also RSVP to meetings here.
Other updates wanted
So what more do we need to make the Calendar app in Teams the perfect replacement for the Outlook calendar? There are a couple of requests at the uservoice page about this.
- MS Teams Meeting Delegation – In this request they want to be able to delegate their calendar as you can do in Outlook so that someone else can schedule or manage your calendars. Status is that Microsoft have Planned this, so just wait and see when it comes.
- Meeting reminders – Get a reminder of your meeting 15 (or custom) minutes before the meeting. An annoying but very useful feature. Status from Microsoft is that they are Working on it.
- Colour categories in Calendar – In Outlook you can colour tag your meetings in the calendar. I use one colour for customer related, education, community work, private meetings, etc. This would be useful to have in Teams calendar too. No status from Microsoft about this.
- Montly view – In addition to Weekly, Workweek and Day view a Monthly view can be useful. Current status is that this is On the backlog so it might come later.
- Propose new time – When you decline a meeting you sometimes want to suggest another time slot. We have this function in Outlook and it would be great to have it Teams. But if it is a Teams meeting you getting invited to, use the Chat for this.
- Invite distribution lists – Currently you can only invite users from Teams calendar, it would be nice if it was possible to invite distribution lists as in Outlook.

M365 Apps & Services MVP | Consultant work at Exobe, based in Göteborg, Sweden. Co-host of Teamspodden, co-organizer of Teamsdagen. Been working with Exchange, LCS, OCS, Lync, Skype, Teams and related stuff for a while. Mostly writing tips and news after getting questions from customers.